Make Premiere Pro Play Normal Speed Again
When editing in Premiere Pro y'all volition e'er want to play your clips back multiple times. playback speed in Premiere Pro is key to this, also equally the playback quality you lot want to use when reviewing your clips.
In today's commodity, we will run through the nuts of playback speed in Premiere Pro and how best to set this up.
Permit'south check out all things playback speed down below!
Playback Speed in Premiere Pro: Everything you need to know
Why is the playback speed in Premiere Pro important? There are many reasons for this, you may exist analysing a shot to ensure you've got the right transition into the next scene blended perfectly.
Or, you lot may be looking at speeding up a sure scene to create a montage, either style, you'll want to adjust your playback speed in Premiere Pro accordingly.
Here are a few techniques to help yous smash the basics!
How to fast forrad or speed upwardly playback in Premiere Pro
How to speed up video in Premiere Pro is another question asked.
To speed up the playback, simply use this keyboard shortcut. Whilst previewing the clip, press 'Fifty' on your keyboard. The more than you lot printing the 'L' button the quicker Premiere Pro will play your clip dorsum to you.
If you lot concur down the Shift key whilst pressing the 'L' button, you will increment the speed of the playback in much smaller steps. This is far easier to command and perfect if you lot're looking at the clip in item.
You lot may also be interested in reading How to create a keyboard shortcut in Premiere Pro
How to rewind a clip in Premiere Pro
Side by side upwardly is the reverse, it'due south how to rewind a prune dorsum in Premiere Pro. To rewind the clip, y'all simply press the 'J' key on your keyboard, and this will immediately rewind your clip.
Similar to the above, the more you press the 'J' cardinal, the quicker your clip will rewind. So keep pressing the 'J' key to get back to the beginning as quickly every bit possible.
How to reduce the speed of your playback in Premiere Pro
Pretty simple but a great shortcut to apply when viewing a clip. To simply reduce the playback speed of your clip, when viewing the prune in fast forrard, reduce the speed by pressing the 'J' central.
The more your printing the 'J' primal, the slower the prune plays until reaching a standstill and then eventually playing the clip in opposite. It's the aforementioned as a remote control, so you can adjust this accordingly past using the 'J' and 'L' keys on your keyboard, depending on the speed you need.
Also, the 'Thousand' key sits between J and L – and this is your break button. Easy enough to navigate and volition speed upwards your editing workflow in Premiere Pro in no time!
You may also be interested in How to export a video from Adobe Premiere Pro
How to playback a clip in irksome motion in Premiere Pro
Slow-motility playback in Premiere Pro is a pretty essential weapon in all video editors armoury (if they use Premiere Pro!).
To play a clip back in irksome motility, follow these unproblematic steps:
If you shot your footage in relatively normal Frames per second, you'll want to reduce the playback settings to around 24fps.
This volition allow you to view them in wearisome movement. To practise this in Premiere Pro, simply highlight your desired clip or clips you wish to slow and correct-click on them.
Then in the Projection Console, click Alter > Interpret Footage. A pop upwardly will appear.

The popup will enquire you if you desire to use the same frame charge per unit as the clips were captured in or if you want to utilise a new frame rate. Select the second one, "Assume this frame rate" and then enter your new desired frame rate of 24fps.
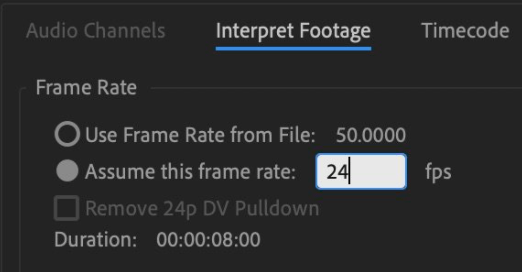
And at present, you can view your footage in tedious motion in the playback module.
*Remember , if yous shot your footage in 24fps, this isn't a part you'll need to use; retrieve, this is strictly for slowing down footage shot at a normal or fast frame rate.
You may also exist interested in How to create slow motility in Premiere Pro
What should I do if the playback is lagging in Premiere Pro?
This happens oftentimes, and at that place are a few reasons why your playback speed is deadening and lagging in Premiere Pro.
We've written a total commodity on how to optimise Premiere Pro, and nosotros go into a lot of detail on how to run Premiere Pro at its optimum functioning.
But here are a few of the well-nigh common reasons Premiere Pro is lagging; permit's bank check them out!
GPU Acceleration in Premiere Pro
Reduce the playback resolution
Firstly, look at reducing the playback resolution in Premiere Pro. You'll probably notice the playback resolution is at a high level; reducing the playback resolution in Premiere Pro has no impact on your exported version of your project.
By reducing the playback quality, yous'll see an instant improvement when information technology comes to playback speed. Information technology volition exist much smoother and terminate whatsoever boosted lag from occurring.
To set up this, only become to your playback tab, and at the lesser, you lot'll encounter a piddling bar (run across below).
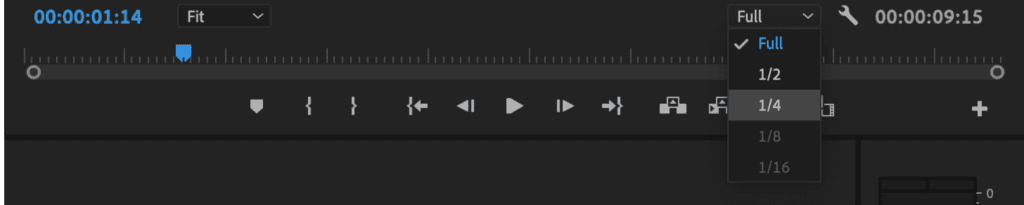
Select the playback resolution bar and motility it to ½ or ¼ – the quality will exist lower, merely its speed will be a huge difference. Remember, the consign will be at the quality you lot select in the export tab, and the playback resolution has no impact.
Disable your clips when you're not using them
When you're not using the clips or editing them in the timeline, make sure you disable them. Every bit a default, all of your tracks in the timeline are enabled.
Yet, this causes you to employ a lot of CPU and will drastically affect Premiere Pros performance.
To stop this lagging, just disable the clip.
To disable your clips in Premiere Pro, just hold downwards cmd+shift+e – for Mac or ctrl+shift+eastward for Windows. If you lot want to enable them, utilise the same buttons above, re-enable your clips.
You may also be interested in half-dozen ways to optimise Premiere Pro'due south performance
We hope this commodity on "Playback Speed in Premiere Pro: Everything you need to know" was useful to you today; please let us know your thoughts downwardly below in the comments. Experience free to scroll a niggling further to access our latest Premiere Pro resource down beneath.
Happy editing!
Accommodate saturation in Premiere Pro
When you lot import your footage into Premiere Pro, yous will want to colour right it and emphasise certain moods and tones. Here nosotros show yous how to adapt saturation in Premiere Pro. Saturation is imperative in post-production to increase or subtract the intensity of the colour in the video. This article looks at what saturation […]
How to greenish screen in Premiere Pro!
E'er wondered how they get the effects behind the weather reporter? Accept you ever wondered how they go those epic effects in one of your favourite action movies? Well, information technology's courtesy of the green screen! Here we show you how to green screen in Premiere Pro. The green screen is an essential part of the […]
How to adjust only peaks in audio in Premiere Pro
Learning how to adjust only peaks in audio in Premiere Pro is an important skill to acquire; it's a small-scale tweak but proves to be an constructive audio editing skill. We look at how to master adjusting audio peaks in Premiere Pro. Let'due south get straight into it. How to accommodate only peaks in audio Premiere […]
How to add vibrance in Premiere Pro
Occasionally after a twenty-four hours of filming and you caput dorsum in to edit, yous'll discover the footage may look pretty dull, and all you lot desire to do is arrive pop off the screen – this is where vibrance comes into play. You can add together vibrance, and we volition show you how to add vibrance […]
How to remove background noise in Premiere Pro
If y'all've e'er had to edit audio in your filmmaking career, you'll know the burden of receiving the sound recording and the first thing y'all hear is unwanted background noise creeping into each and every scene. In this guide, we show you how to remove background noise in Premiere Pro. It happens quite oft where […]
How to add movement blur in Premiere Pro
Creating motion blur in Premiere Pro helps to add realism to your projection and can right your movie in post-product. We wait at how motion blur happens, how you can control motility blur and prove yous how to modify motion blur in Premiere Pro. Let's bank check it out! What is movement blur? Merely put. Motion […]
Source: https://ifilmthings.com/playback-speed-in-premiere-pro/#:~:text=Whilst%20previewing%20the%20clip%2C%20press,playback%20in%20much%20smaller%20steps.
0 Response to "Make Premiere Pro Play Normal Speed Again"
Post a Comment